How to Create a High-Quality Dataset
A dataset is a collection of clean, high-quality audio files of a single speaker that Applio uses to train a voice model. The quality of your dataset is the single most important factor in achieving good training results. A high-quality dataset consists of clear, consistent, and noise-free audio.
This guide will walk you through the process of creating a great dataset.
Dataset Creation Workflow
Section titled “Dataset Creation Workflow”Step 1: Source Your Audio
Section titled “Step 1: Source Your Audio”First, you need to collect audio of the person or character you want to create a voice model for.
Step 2: Isolate the Vocals
Section titled “Step 2: Isolate the Vocals”If your audio contains background music or other sounds, you’ll need to isolate the vocals. For a detailed guide on how to do this, please see our audio isolation guide.
Step 3: Clean and Process Your Audio with Audacity
Section titled “Step 3: Clean and Process Your Audio with Audacity”Once you have your vocal recordings, it’s time to clean and process them using a free audio editor like Audacity.
Noise Reduction
Section titled “Noise Reduction”Noise reduction helps to remove unwanted background noise from your recordings.
- In Audacity, select a small portion of your audio that contains only background noise.
- Go to Effect > Noise Removal and Repair > Noise Reduction.
- Click Get Noise Profile.
- Now, select the entire audio track.
- Go back to the Noise Reduction effect and click OK to apply it.
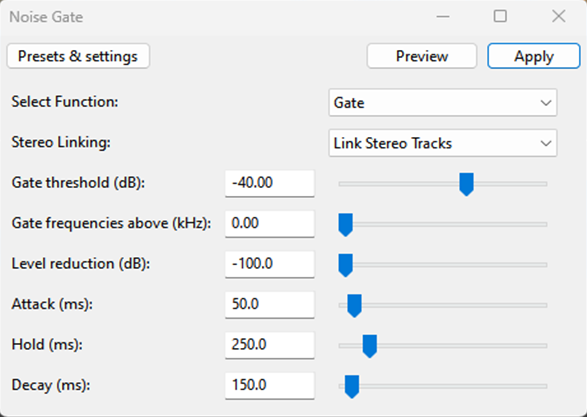
Noise Gate
Section titled “Noise Gate”A noise gate is used to silence parts of the audio that are below a certain volume threshold. This is great for removing low-level noise between words and sentences.
- Select your entire audio track.
- Go to Effect > Gating > Noise Gate.
- Apply the recommended settings as shown in the image below. These settings are a good starting point, but you may need to adjust them based on your audio.
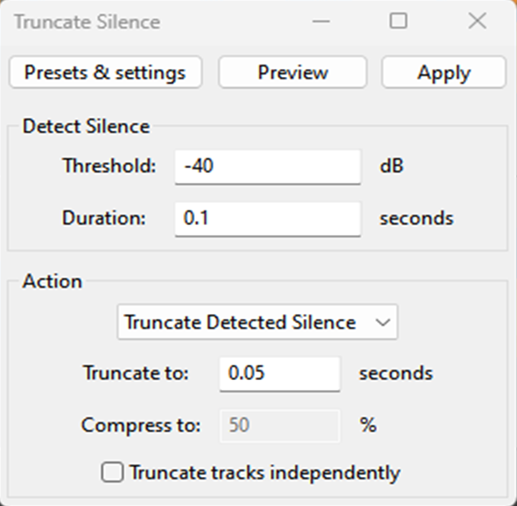
Truncate Silence
Section titled “Truncate Silence”This effect removes long periods of silence from your audio, which helps to create a more concise dataset.
- Select your entire audio track.
- Go to Effect > Truncate / Silence > Truncate Silence.
- Apply the recommended settings as shown in the image below.
Step 4: Export Your Dataset
Section titled “Step 4: Export Your Dataset”Once you’re happy with your audio, it’s time to export it.
- Go to File > Export > Export as WAV (or FLAC).
- Choose a location to save your file.
- Ensure the format is set to WAV (Microsoft) signed 16-bit PCM or FLAC.
- Click Export.
| WAV Export Settings | FLAC Export Settings |
|---|---|
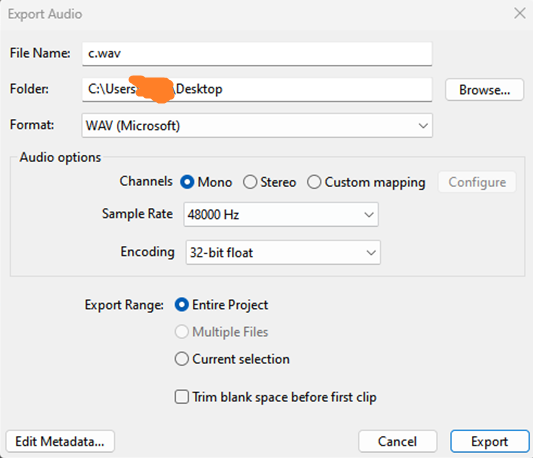 | 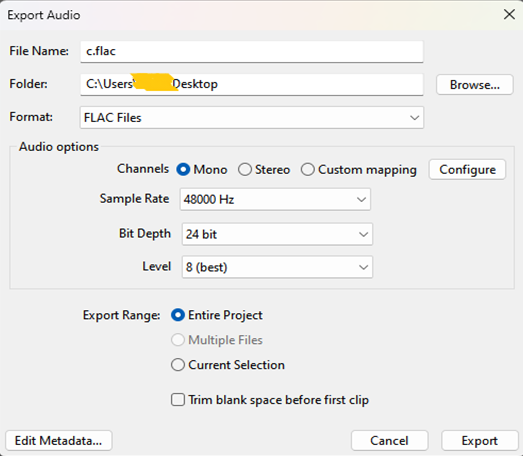 |
Your dataset is now ready for training!
Recommended Audio Editing Plugins
Section titled “Recommended Audio Editing Plugins”While Audacity is a powerful tool on its own, you can extend its functionality with plugins. These plugins work with Audacity, FL Studio, and other DAWs.
- T-De-Esser: A de-esser is a tool that reduces sibilance, which is the harsh “s” sound in speech. This is a must-have for creating clean vocal recordings.
- ReaPlugs: A suite of powerful plugins from the creators of the Reaper DAW. It includes a more advanced noise gate, EQ, and compressor.
- Auburn Sounds Renegate: A sophisticated noise gate plugin that gives you more control than Audacity’s built-in noise gate.