Voice Conversion with Inference
Inference (or voice conversion) is the process of using a trained voice model to convert an audio file from one voice to another. Under the hood, Applio extracts the pitch and linguistic content from your input audio, retrieves matching timbre features from the model’s index, and synthesizes a new audio file that preserves the original phrasing and emotion but with the target voice’s character.
Applio makes this process simple and provides a wealth of advanced options for fine-tuning your results.
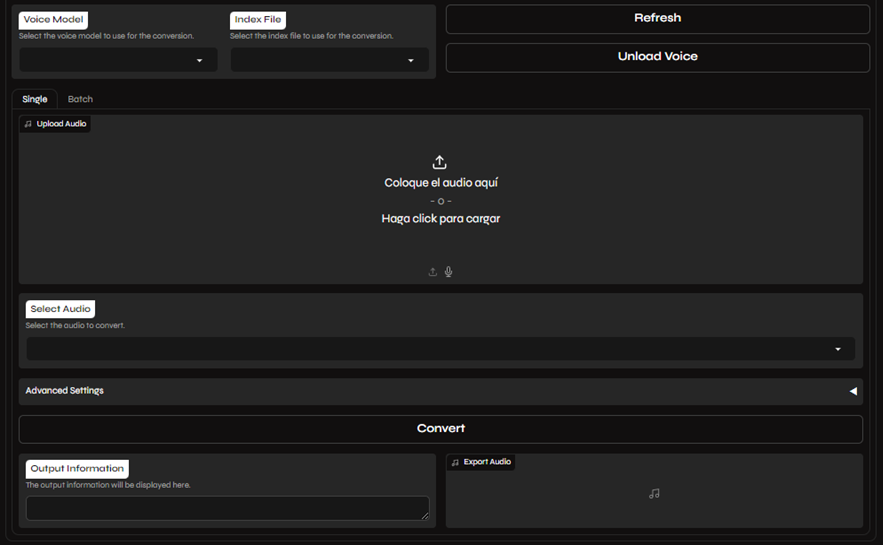
How to Perform Inference
Section titled “How to Perform Inference”You can perform inference on a single audio file, or on a batch of files at once, or on a stream of audio in real time. The realtime inferrence feature is significantly different, though, and so has its own tab.
- Select Your Model: Choose the
.pthand.indexfiles for your model. If you don’t see your model in the list, click the refresh button. - Upload Your Audio: Drag and drop your audio file into the input box, or click to browse your files.
- Convert: Click the Convert button to start the voice conversion process. The time it takes will depend on the length of your audio and the speed of your computer.
- Select Your Audio Folder: Enter the path to the folder containing your audio files in the Input Folder field.
- Select Your Model: Choose the
.pthand.indexfiles for your model. - Convert: Click the Convert button to process all the files in the folder.
Advanced Settings
Section titled “Advanced Settings”Applio provides a wide range of advanced settings to help you achieve the perfect voice conversion.
Basic Settings
Section titled “Basic Settings”- Export Format: Choose the audio format for your converted file (e.g., WAV, FLAC, MP3).
- Split Audio: This option chops the audio into smaller segments for processing and then stitches them back together at the end. This can be useful for very long audio files to avoid memory issues.
- Autotune: Applies a gentle autotune effect to the output. This is often recommended for singing conversions.
- Clean Audio: Uses noise reduction algorithms to clean up the output audio. This is recommended for speech-to-speech conversions.
- Upscale Audio: Enhances the quality of the output audio. This is useful if your input audio is low quality.
- Clean Strength: Controls the intensity of the audio cleaning. Higher values are more aggressive but can sometimes introduce compression artifacts.
Pitch and Voice Settings
Section titled “Pitch and Voice Settings”- Pitch: Adjusts the pitch of the output in semitones. Use negative values to lower the pitch (more masculine) and positive values to raise it (more feminine). A common starting point is -12 for male-to-female and +12 for female-to-male. For singing, smaller adjustments (e.g., -3 to +3) are often more appropriate.
- Filter Radius: Applies a median filter to the F0 contour to reduce breathiness and pitch jitter. Values between 1 and 5 are typical. Higher values produce smoother pitch but may sound less natural. Default is 3.
- Search Feature Ratio: Controls how closely the output matches the target speaker’s voice by determining the blend between the input embedding and the retrieved index features. At 0, no retrieval is used (the model relies entirely on the embedder’s output). At 1, the output is maximally influenced by the index. Values between 0.3 and 0.8 are typical. Higher values produce more accurate timbre matching but may introduce artifacts.
- Volume Envelope: Blends the volume dynamics of the output with the original audio. At 1, the output retains its own volume envelope. At 0, the output follows the original audio’s volume. This is useful when the converted output sounds too compressed or too dynamic.
- Protect Voiceless Consonants: Preserves the clarity of consonants and breathing sounds by protecting them from excessive modification. Recommended values are between 0.3 and 0.7. Higher values better preserve sibilants and plosives but may reduce conversion quality.
- Hop Length: Determines the analysis frame stride in samples. Smaller values (e.g., 128) provide more precise pitch tracking at the cost of higher processing time. Larger values (e.g., 320) are faster but may miss rapid pitch changes. Default is 128 for speech, 192 for singing.
Models and Algorithms
Section titled “Models and Algorithms”- Pitch Extraction Algorithm: Choose the algorithm used for pitch detection.
rvmpeandcrepeare popular choices, but you can experiment to see which one works best for your audio. - Embedder Model: Select the embedder model that was used to train your voice model. This must be the same embedder used during training.
- Formant Shifting: This can be used to make male-to-female and female-to-male conversions sound more natural. You can adjust the Quefrency and Timbre for formant shifting.
Post-Processing Effects
Section titled “Post-Processing Effects”You can apply a variety of audio effects to your output file.
- Reverb: Adds reverberation to the audio.
- Pitch Shift: Shifts the pitch of the audio in semitones.
- Limiter: Prevents the audio from clipping.
- Gain: Adjusts the volume of the audio.
- Distortion: Adds harmonic distortion to the audio.
- Chorus: Adds a chorus effect.
- Bitcrush: Reduces the bit depth of the audio, creating a lo-fi effect.
- Clipping: Intentionally clips the audio at a certain threshold.
- Compressor: Reduces the dynamic range of the audio.
- Delay: Adds an echo effect to the audio.
Command-Line Inference
Section titled “Command-Line Inference”All inference features are also available via the command line for automation and scripting:
# Basic conversionpython core.py infer --input_path input.wav --output_path output.wav --pth_path logs/MyModel/G_1000.pth
# With pitch adjustment and specific settingspython core.py infer --input_path input.wav --output_path output.wav --pth_path logs/MyModel/G_1000.pth --index_path logs/MyModel/MyModel.index --pitch -3 --f0_method crepe --embedder_model contentvec
# Batch processing an entire folderpython core.py batch_infer --input_folder ./input_folder --output_folder ./output_folder --pth_path logs/MyModel/G_1000.pth --index_path logs/MyModel/MyModel.index
See the CLI Reference for a complete list of all available options.
Tips for Better Results
Section titled “Tips for Better Results”If your output audio sounds robotic or has artifacts, here are a few things you can try:
- Improve Input Quality: The better your input audio, the better the output will be.
- Check Model Training: If you’re using a custom model, it may be undertrained or overtrained.
- Clean Your Audio: Use a tool like UVR to remove any reverb, background noise, or double vocals from your input audio.
- Verify Dataset Quality: If your model was trained on a noisy dataset, you’ll need to clean the dataset and retrain the model.
- Experiment with Settings: Don’t be afraid to experiment with the advanced settings to find the best combination for your specific audio.